Put some twinkle in your toes with eight simple movements
by Louise Fecher
By the end of a long winter, even the comfiest socks feel like a toe prison. When the first sort -of-warm day arrived in New York a couple of weeks ago (before getting cold again 🙁 ), I tossed my socks and slipped into open-toe espadrilles. Never mind the wind beneath my wings–the wind between my toes felt wonderful.
Do your feet crave a treat? Professional pedicures and massages are heavenly, but you don’t need an appointment–or spare cash–to exercise your feet at home. I often include simple foot warmups and exercises, like those listed below, in my yoga classes. The following movements don’t require props and are easy to follow; what’s more, the whole routine can be done in 10 minutes.
Our feet, the ground floor of our body, work hard for us all day long. Exercising them not only keeps the feet happy, but also encourages strength and stability through our upper floors (the knees and hips) as well. So strip off the socks and get those tootsies moving!
1 Start warming up by slowing circling one ankle clockwise, making 3 full turns. Then circle 3 times counterclockwise. Repeat with your other foot. Take your time and notice any stiffness or other sensation.
2 Come back to your first foot and point the toes like a ballet dancer to stretch the top of the foot and front of the ankle. Then flex the ankle, pushing through the heel. Repeat this action 3 times, then switch to the other foot.
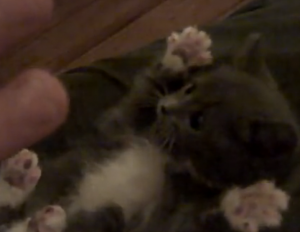
3 Wiggle the toes of one foot. Then slowly curl your toes toward the sole of the foot, as if making a fist with toes instead of fingers. Reverse this action by spreading your toes wide apart, as if they just got a surprise–whoopie! (Watch the adorable “Surprised Kitty” video if you need inspiration.) Repeat the Toe Curl/Surprise Kitty movements 2 more times, then perform the movements with your other paw foot.
The Yoga Handshake
Over time, our toes can bunch up like a snobbish clique of mean girls and refuse to make a move on their own. One exercise that can help separate mean girl toes is the yoga handshake. Before you begin, you may want to rub hand cream on your feet and between the toes. This isn’t necessary, but it may help you slide the fingers in between the toes, as directed below.
4 Sit in a comfortable position that allows you to reach your feet easily. Hold the top of one foot with the same-side hand. 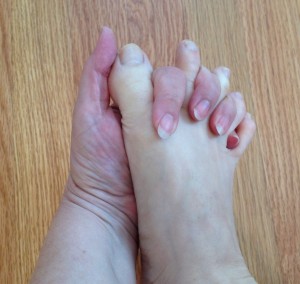 Working from the sole of the foot, slide the pinky finger of the opposite hand in between your little toe and its neighbor. Next, work your ring finger in between the second and third toes. Continue threading the fingers between the toes, leaving the thumb free.
If your toes are very tight, you may not be able to thread all the fingers the first time you try. Resting the fingers between the toes may offer enough stretch, but for more sensation, rock the fingers back and forth (the secret “handshake”) and/or fan the fingers to spread the toes. (If these movements don’t offer any sensation or challenge, try the downward yoga handshake instead, threading the fingers from the top of the foot.)
5 With your fingers still nested in the toe spaces, slide your thumb along the inner arch of your foot. Massage tender areas with slow and firm circular motions, and/or gently press your thumb down, and hold, over tight spots. Release and wiggle the toes. Repeat with the other foot.
Indie Spirit
With repeated practice, the yoga handshake will help unstick glued-together toes. The next exercise, which can be performed sitting or standing, encourages the toes to move independently.
6 Press one foot down, grounding the balls of the toes. Lift and spread the toes, then lower them. Be sure not to let the foot roll toward the outer side; the big toe mound needs to remain grounded. (At first, not all the toes may lift; the pinky toe can be especially stubborn.) Repeat 2 times, then switch feet. Practiced regularly, this exercise lifts and strengthens the inner arch, which can help reduce pain from bunions–the bony bumps that develop when the big toe angles in toward its neighbor toes.
7 Next, keeping the other toes relaxed, lift the big toe of one foot off the floor, then lower it down, trying to stretch it forward as you do so. Repeat the Big Toe Pushup 5 times. (You may feel sensation climb up through your inner arch into the calf.) If the toe refuses to lift on its own, hold down the other toes. (Giving the toe a pep talk also helps.) Repeat with the other foot. Try the same action with the little toe of each foot. If you can get the pinky toe to move even a tiny bit, it counts!
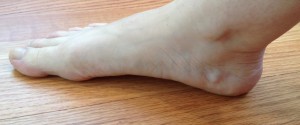
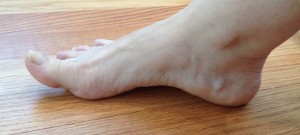
Big Toe Pushups activate and lift the inner arch of the foot, as shown above. Notice the lift in the inner arch of the foot performing a Big Toe Pushup, right, compared to the arch of the same foot at rest, left.
8 To increase toe mobility (and impress your friends), press both feet to the floor, ground the toe mounds, and lift all the toes. Then lower just the big toes. Continue lowering the toes, one at a time if you can, then lift them up again, one at a time, making a ripple effect. Repeat 2 times. At first, your toes will resist moving independently, but with practice, you’ll get a little wave action going.
Wrap up your private foot treatment session by vigorously rubbing the soles and arches with your knuckles, one foot at a time. Celebrate the arrival of sandal season with some or all of the above movements. If your time is as tight as your toes, try working just a few of the exercises into each week and see where that first step takes you.
Happy feet photo © Cristian Marin | Dreamstime.com.


